Monday, February 6, 2023

Pursuits

The past two nights, I took a couple of hours off, disconnected from the electronic world to pursue things I really enjoy. By setting aside this time, I managed to complete a couple of tasks that no longer seem like tasks. 

You see a lot of what I think right here, but you can follow what I do in two (now just one, I deleted my locals.com page) other places, Ko-Fi, and Locals. Each outlet is for different aspects of the things I enjoy. Locals is the easier of the three outlets. I talk about several of my other hobbies, from gardening to artwork to travel. Ko-Fi is for a project I am working on, a rule-set agnostic campaign setting based on the romantic period. It is odd and quirky and I hope to garner some backers over there to support it. Of course, there will always be a blog where I post about any game topic that strikes my fancy. 

Operation Spartan Restoration

I started restoring my Mechs tonight. I picked one and ran with it. 


The tools and supplies are rather basic. I used a fine-point sharpie instead of the pencil I normally use for photo quality. I also needed a razor and a couple of files. For glue, I used Tacky Glue and Superglue together, which is an interesting trick. 

The final item is the material needed to resculpt the arm, a piece of soapstone. This product is found in the welding supply section of your local hardware store. Soapstone is incredibly soft yet heat resistant, which means you can mark materials and hit them with enough energy to melt metal without burning up your markings. 

It comes in two forms, a flat bar, and cylinders that fit into a pen-like holder. The cylinders are nice for columns and such. 

The first thing I did was roughly trace the arm I wished to sculpt. It doesn't have to be a work of art AND it needs to be bigger than the arm you want. 

Soapstone has a grain just like wood. Unlike wood, it is remarkably honorable to your tools, meaning you can push and pull against the grain. What soapstone does not like is compression or impact. It will shatter like very soft glass. 

Whittling down this one piece took about 15 minutes most of which was spent taking pictures. One item I did not mention was a plastic bag to sweep all of the dust and fragments into. I didn't take a picture of that because it looks like a bag of crack. 

I try to roughly carve the arm down to the right size and proportions. Notice that I don't cut the arm away from the larger piece. It's too small for that. 

I used a mech to size up the arm as I work. Luckily, I have mechs with broken right and left hands, so I have a model to work from. 

Once I am down to the right size and proportions, I carefully... Carefully... cut the arm away from the bar. When making these cuts I work my way into the bar, not away from it. 

These are actually cuts, every bit of work so far is with a razor. This is the other reason you don't remove the piece from the bar. You'll have nothing to hang on to and cut yourself. The other devastating disaster is dropping the part on the floor and chipping it so badly it's useless. 

I skipped all of the pictures of sanding with files. It's super boring to look at. A file will knife right through soapstone, so go slow. You can't exactly put the material back. 

Well, actually you can add material back but it is annoying, time-consuming, and labor-intensive. It also makes fine-tuning your model very difficult. 

Remember the bag of soapstone dust and chips? You can apply layers of glue to the damaged portion and add soapstone chips and dust to it. The problem with this methodology is it takes time to dry and the glue/stone laminate is really tough stuff. Filing becomes much harder. It's also super sad if the glue slips off the model and you have to glue it back on a second time. Thankfully, the glue and soapstone mix will keep it's shape, it's only annoying. 

Anyway, the last step is to add the details, like the etched-in lines. You can get remarkably detailed in this work, like scrimshaw on ivory. You might be tempted to use a razor to do some of this work. Don't. Instead, use a pin with a handle. I personally like removing a rubber eraser from a pencil, shoving a pin through it, and gluing it back into place. 

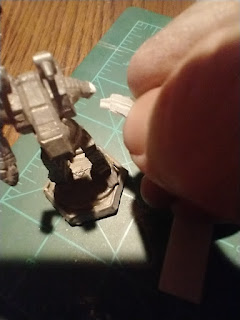
In order to mesh the parts up, I filed the metal of the model down into a V-shaped point and did the reverse on the soapstone part. This increases the surface area and allows you to feel when the part is in the right place. I've shown you the final image, but I want to show off one more trick with the second last image. 


See the white spot of glue on the metal model? That isn't just glue, it's soapstone powder on the tacky glue. I put the super glue on the soapstone part and touch them together. There is a quick chemical reaction between all three substances and the dry time is about 5 seconds. It's pretty cool. 

I am saving another trick for my next post. See you there. 


Sunday, February 5, 2023

The Weird Unboxing - Gifts from the Past

I've made an effort to push past certain things that happened in the past two years, but I want to bring something up that I have been ignoring because it's strange and interesting. 

After the house fire, the ceilings fell down, revealing a stack of cardboard boxes we had in the attic. It was very odd because the attic entry was in the garage and the attic is over the house. These boxes were stuffed "way in the back", which corresponded to the center of the house where most of the destruction was. We had no idea what was in these boxes until Jack, our contractor got a ladder and recovered them. 

Well, having lost nearly everything, anything in the boxes would be surprising. 

Inside was my wife's Cabbage Patch Kid from when she was a child, 3 packets of photographs from right before our wedding, a cat carrier, a dishrack, a baby bathtub, and a few of other oddities of mine. Exactly how these cardboard boxes survived in the center of the house, where the ceiling collapsed is a total mystery to me. 

I'd like to detail the gaming things found in that box. 

The first is a paper, hand-drawn map from when I was in high school. I recall putting it away after spilling something on it. Back in the 90's the only way to fix such a thing would be a lightbox or tracing paper. In 2023, the magic of photo editing software can do this in seconds. 

This was one of my first campaigns with a good map and spilling Coke or coffee on it annoyed me to no end. I stuffed it in a box and tried to forget about it. I can't believe how easily this problem is fixed now. 

The map pairs nicely with the dozens of photos I found. In 2021, I made an effort to scan every photo I had and backed them up to the cloud. Boy, I am glad I did. We were vaguely aware that some photos were missing that we attributed to moving right after getting married. 

We were half right, they made the move... to the attic. 

I figure I can spend next weekend scanning like a nut. 

Next up are a series of Reaper minis in the package and a blister pack of Micro Machine Star Wars figures. The packages were at the very top of the box and suffered a lot of smoke damage. They probably protected the things underneath them. Once I disposed of the packaging, the figures looked (and smelled) brand new. The Star Wars figures are plastic and the Reaper figures are soft metal. I'm shocked that they survived at all. 

By way of comparison, I had a box of Battletech Archers (or Robotech Spartan, if you like,) in the basement. Oddly, some of them are super clean like they were never painted and others are slightly charred. Notice the damage to the arms. I liked to kitbash models and often replaced or repositioned an arm. The glue vaporized, leaving me with armless figures. 

Presumably, the arms fell off and were swept up as debris. Understandable considering how much of the first floor fell into the basement. 


I am not too worried about that. I've modded hundreds of Battel Mechs and I have new material to work with. If you zoom in on the Grey mecha, (top row, second from the right), you can probably see the wood grain on the left arm despite the painting. That's because it's balsa wood. 

A while ago, I discovered a different material for figure mods: soapstone. I am going to fix all of these figures up in the coming weeks and I can't tell you how excited I am to try this new material and method. Soapstone is super soft and easy to carve and cut with hand tools. But relative to a metal figure, it is about as durable. 

Soapstone is ironically fireproof.

I am so done dwelling on what has happened. But there is this odd comfort in remembering what DID NOT happen. We all survived to get to this point of moving forward. Finding this box was a sort of gift from the past. I look forward to putting these things right and I will probably post a lot of images as this little project progresses. 


Saturday, February 4, 2023

Creeping Issues

Just a brief heads up. I have noticed creeping issues with my blog, such as odd fonts and strange formatting issues. I'm using a super old theme and I am going to change it this weekend. Theseoldgames.com hasn't been hacked, I'm just really bad at code.